Planning an RV Trip
We are planning our first major RV trip for winter, 2022. We may leave in December 2021 or in January 2022, and probably come back in about 3 months. We bought an RV and a truck. The truck is fine (a Freightliner Sport Chassis), but the RV needs a little work, though nothing really major. Some things don’t seem to be working, and we need to figure out why that is. Often it is a button or switch we haven’t yet figured out. But we have some months to get this resolved right now. Meanwhile, the reports are the campgrounds are completely filled with all of the people who couldn’t travel any other way, so some planning is in order. I hope that it will be a little better when we go since the main season is the summer, of course.
A beginning point is a course I bought from a couple of YouTubers who have a channel called A Streamin’ Life (they have an Airstream trailer, hence the name), which is very good and detailed on how to plan a trip and the tools you can use. You can find it at https://courses.saadigital.com/p/how-to-plan-your-epic-rv-adventure/. I am quite happy to recommend this as good value for money, and I may repeat some things from the course in my discussion, but you really should purchase this if you want to get the full value.
Our starting point was looking at a map (we use Google Maps) and seeing what was due south of us in Michigan. And due south of us eventually gets to Florida. But Florida is where a lot of east coast people go in the winter, so it might not be the best time to go. But in looking at the route I noticed Huntsville, Alabama, and told Cheryl I always wanted to go there. This is where the Space Camp is located, and while I am probably too old to survive that now, I wanted to visit the facility. As we discussed it, Cheryl suggested that maybe a trip themed around NASA locations might be a good idea. (As you may have guessed, I married far above my level.) I suspect the hats and T-shirts I have with NASA insignia may have been a clue to her.
So step one was where I started a Google Map for the trip. To create a map in Google, you click on the “hamburger” icon in the upper left (that is the one with three horizontal lines, like a burger in a bun), then select Your Places. Go over to Maps on the left and click on it, and you will see any maps you have created. And if you haven’t created one yet, go to the bottom and click Create Map. I have several in there already. The first one I created was for our trip to The Netherlands and Belgium on 2016, and I made one of our state of Michigan to help with planning some trips. But something worth pointing out is that there are maps other people have created and shared which you can copy into your own Maps space. For instance, I did a search and found a map of U.S. National Parks and National Monuments. I don’t own this map. I can, if I wish, copy it into my own collection, but so far I have not found a need to do this since the map stays available to me.
The next thing you need to know about Google Maps is that it is organized in Layers. These layers can be viewed individually, or you can view several together, just like the layers in a graphics program like GIMP. This lets you put different information on separate layers, which can make it easier to deal with than a single layer with everything on it. I started with a layer that has all of the NASA places a person can tour. I did a search and found the site at http://www.visitnasa.com/nasa-visitor-centers which listed all of the NASA Visitor Centers in the U.S. Then in Google Maps a I created a layer called NASA Visitor Centers. From the NASA Site I grabbed the address of each center, entered it into the search box in Google Maps, and in each case the map zoomed into the location. A little pop-up box appeared, and in the bottom of this box was a link called +Add to map. I did this for all of the Visitor Centers. Then, I went to a box in the upper left:
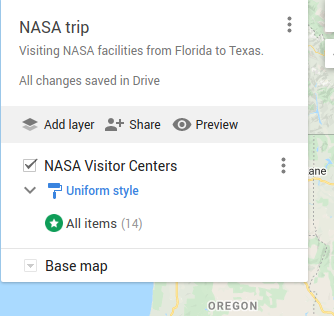
You can see that on top it gives the name of the map and the description I gave it when I set it up. And under that you see the Layers. Right now I only have one layer, the one for the Visitor Centers. But I know I will be adding more. So to keep the confusion factor down I want to use different styles for different map buttons. So first I make sure I have it set to Uniform Style, right under the Layer name. That way all of my Visitor Centers will have the same style for their map buttons. You can see where it says All items. If you mouse over that, you will see an icon appear on the right, a paint bucket pouring paint. Click that, and you can see this window:

I picked a green color (for no particular reason), and then the circle with a star icon. But you might note that on the bottom there is a button for More Icons. There are at least a hundred icons available in the categories:
- Shapes
- Sports and Recreation
- Places
- Transportation
- Crisis
- Weather
- Animals
Having all of these available is a big help to planning a long trip.
Now, my map looks like this:

You should understand that it took a lot longer to explain how I did it than it took to do it. I think it took me about 15 minutes to get it to this point.
Layers Within Layers
Another feature of Google Maps is that each layer contains other layers, which are the Views you can have. This is very useful for planning purposes. When you go to Your Places, click on a map, and in the lower left you will see a square that says Layers. Mouse over it and a window opens on the left. To see all of your options here, click the More button to bring up this window:

You can view your map in a variety of ways. Most of these would only be useful when you are zoomed in to a local area:
- Transit – If you are in a new city, or plan to visit one, you can see the various kinds of transit available to you such as Buses or Metro. You can get directions and schedules for your transit options.
- Traffic – If you plan to be driving in a new location, check out the traffic. You can also see the average expected traffic for a specific time and day, handy for planning ahead.
- Biking – We both enjoy biking. In fact, our trip to The Netherlands and Belgium in 2016 was a bike trip (in part) as we biked from location to location while sleeping and eating on the boat. We plan to bring our bikes with us on our RV travels as well. We prefer to find bike trails that are not sharing the road with cars because we live in the U.S. and there are crazy people here. It is not like Europe where bikes seem to have the right of way everywhere, or at least everywhere we have been so far. This setting will give you information about bike paths you can use for planning.
- Terrain – This is also worth looking at. For biking we would like to avoid any steep slopes, but it also matters a lot when towing a heavy RV. It pays to check this out when planning.
- Street View – This is important when towing an RV because they are big. Ours is 13 feet, or about 4 meters tall, and we really don’t want to run into low branches or other similar obstacles. Major highways are not usually a problem, and the right GPS can route you away from low bridges. But if someone offers to let you stay on their property, you need to see if you can do it safely, including making the turn without crunching into a tree or mailbox. Street View is great for this.
- Covid-19 info – This is a sign of the times currently. This map gives you a view of the prevalence of Covid-19 in each area so you can avoid hot spots. We can hope it is not necessary in a few years, but right now I don’t know if I can be that optimistic.
In addition, you can switch from Default map view to Satellite view, or even a 3-D Globe view, though I don’t see a need for me to use that one.
OK, we have had an introduction to Google Maps and created a first layer with all of the NASA Visitor Centers. Next we will move on to further planning steps.
 Save as PDF
